


AC HEATER/EVAPORATOR
BLOWER REPLACEMENT
By
Steve Hawkins
In Houston, TX, a car that blows cool air at its passengers is a requirement for enduring the stifling heat and humidity that often accompanies summer drives. Unfortunately, my Pantera’s ventilation only occurs with it’s windows down as my car’s blower motor hasn’t worked since I bought the car. At first, I was optimistic it was a simple electrical gremlin; however, my due diligence investigation enlightened me that the blower motor was bad. With summer having arrived and my strong desire to participate in the Space City Pantera’s summer schedule, I knew that I could no longer procrastinate on this project. For the benefit of others who may be in a similar predicament, I have chronicled my repair.
Dash Removal
I began by removing my early two pod dash. Having been through this exercise before, I extract it in about 30-45 minutes. Dash mounting screws lie behind the glove box, tachometer and speedometer. Remove all three items to access these screws. The rest of the Dash mounting screws are easily accessible on the bottom of the dash. There are plastic spacers between the chassis and the dash mounting tabs where the screws are located. These spacers may be of different thicknesses; be certain to match the spacer with it’s location for proper reassembly. It is also necessary to lower the steering column to allow the dash to come out without obstruction.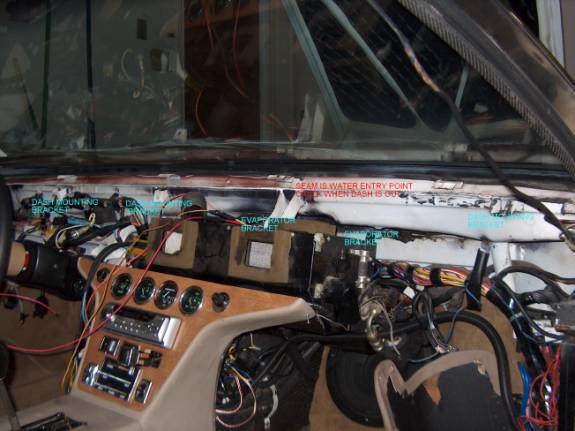

Core Removal
With the dash out, I loosened the three mounting bolts for the heater/evaporator core and moved it forward as far as possible. I then removed three screws from the top of the squirrel cage blower housing on the passenger’s side of the car. These screws are not visible; you have to feel around for them. (see photo)
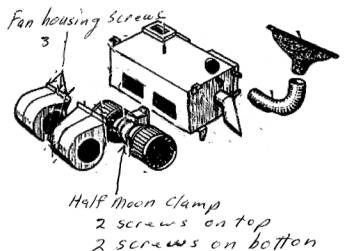
Blower Motor Removal
The motor is held in place by a plastic clamp. By removing the two screws located at the top and bottom of the clamp, a half moon piece of the clamp can be removed. Next, there is a metal brace screwed to the inside ends of each squirrel cage blower housing. By removing one of these screws the passenger's side blower housing can be removed (this takes careful maneuvering of the housing, wiring & hoses). You can now disconnect the two wires going to the motor and maneuver the motor and squirrel cage blowers out.
New Blower Motor
I replaced my motor with a Frigette 209-101, PM397 which I found locally for $46. This is a 3 speed motor with 3 windings for the different speeds, no resistor is needed. I used a 3 speed switch that I found locally at a Custom Van shop in place of the stock two speed switch.
Installation of Motor and Dash
To install the blower motor, simply reverse the removal procedure.
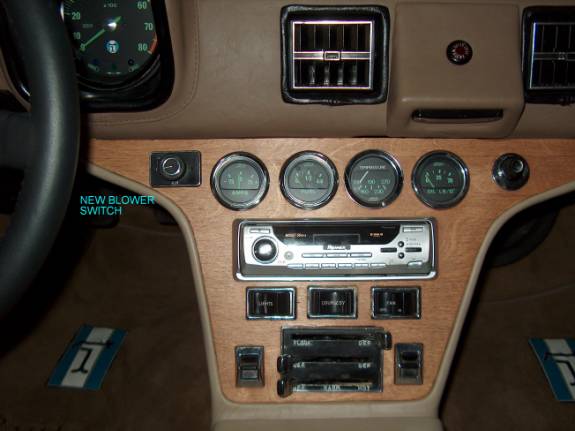
After the blower motor and evaporator are bolted back up you can proceed to wiring things back up. I replaced my gauge panel rheostat with a new 3 speed switch to control the fan motor. It was necessary to extend the existing motor wires that connect to the switch about six inches.
The power supply wire to the old switch will reach the new switch location. The new switch has an auxiliary contact that I used for the blower light that is on the odometer face. When the blower is energized, the blower light visible on the odometer face will come on just as before.
Before you put the dash back in place, it is prudent to test the blower for any interference or rubbing when the fans rotate. The squirrel cage fans and motor may need to be adjusted to keep it from rubbing the fan housing.
All that is left is to reinstall the dash and steering column. Take your time, be patient, and don’t force things. Be methodical and reverse the removal procedures. The entire project took me approximately 8 hours spread over a couple of days.
Your dash will not only fit in place nicely, but a quieter motor will blow refreshing air at you while you cruise in your Pantera!
Summer, eh – Bring it on!